进入 2026 年,AI Agent 越来越频繁地出现在我们的视野里,那到底什么是 AI Agent?
举个例子,3 月份爆火的 OpenClaw “小龙虾”,本质上是一个 AI Agent;开发人员最常用的 AI 辅助编程工具 Claude Code 和 Codex,本质上也是 AI Agent。OpenClaw 和 Claude Code 功能全面,代码量也庞大。这篇文章,我们会一步一步构建一个最小版本的编码 Agent,以此建立对 AI Agent 的直观感受。
1. 四步构建法
文章按照下面 4 个步骤来构建 agent:
- 接入 LLM;
- 添加工具;
- 构建 agent 循环;
- 构建对话循环;
不论实现的 agent 执行什么任务,都可以采用这样的 4 个步骤来构建。
2. 实现编码 Agent
Agent 可以使用我们熟悉的任何语言来实现,例如 TypeScript,Python,Rust 等等,只要它接入 LLM 方便,可以调用 shell 命令工具就行。这里我们选择 Python。
完整的示例代码已经上传到 GitHub,链接在文章后面
2.0 项目设置
# 如果没有安装 uv,先安装它
pip install uv

# 初始化 uv 环境
uv init
2.1 接入 LLM
LLM 选择了 Kimi,Kimi 开放平台 注册的账号在完成个人认证后会收到 15¥ 赠送额度,拿来演示够用了。Kimi 开放平台兼容 OpenAI 协议,可以直接使用 OpenAI SDK 接入。
## 添加 openai 依赖库
uv add 'openai>=1.0' python-dotenv
## 文件:1_with_kimi.py

import sys
import os

from openai import OpenAI
from dotenv import load_dotenv

load_dotenv()

client = OpenAI(
    api_key=os.environ["MOONSHOT_API_KEY"],
    base_url="https://api.moonshot.cn/v1",
)

content = sys.argv[1]

completion = client.chat.completions.create(
    model="kimi-k2.6",
    messages=[
        {
            "role": "user",
            "content": content,
        }
    ],
)

print(completion.choices[0].message.content)
- 验证 LLM 接入是否成功
$ python 1_with_kimi.py "中国面积最大的省份是哪个?"
严格来说,中国面积最大的**省**是**青海省**,面积约72.23万平方公里。

不过,如果问题指的是所有省级行政区(包括自治区、直辖市等),那么面积最大的是**新疆维吾尔自治区**,面积约166.49万平方公里,它也是中国最大的省级行政区。

**简单区分:**
*   **最大的省**:青海省
*   **最大的省级行政区**:新疆维吾尔自治区
*   其他面积较大的省还有四川省(约48.6万平方公里)和黑龙江省(约47.3万平方公里)。
2.2 添加工具
2.2.1 先添加一个 read 工具
首先添加一个 read 工具,它允许 agent 从文件系统读取文件。我们使用 Python 库 Pydantic 进行 schema 验证,这个库也能生成 API JSON schema。
uv add pydantic
from pathlib import Path
from pydantic import BaseModel


class ReadArgs(BaseModel):
    """Read a filesystem file"""

    path: str


def read(args: ReadArgs) -> str:
    try:
        return Path(args.path).read_text()
    except Exception as e:
        return f"Error: {e}"
可以通过下面的代码查看 Pydantic 库生成的 schema:
print(ReadArgs.model_json_schema())
为类 ReadArgs 生成的 json schema 是下面这样的:
{
  "description": "Read a filesystem file",
  "properties": {
    "path": {
      "title": "Path",
      "type": "string"
    }
  },
  "required": [
    "path"
  ],
  "title": "ReadArgs",
  "type": "object"
}
将 Pydantic 库生成的 schema 包装成 LLM 可理解的工具描述:
read_tool: ChatCompletionToolParam = {
    "type": "function",
    "function": {
        "name": "read",
        "description": "Read a file and return its contents.",
        "parameters": ReadArgs.model_json_schema(),
    },
}
调用 LLM 时,将 read 工具添加到 API 请求中;LLM 处理 API 请求,决定要使用的工具,然后通知 agent;agent 根据收到的通知,执行指定的工具,并将工具结果送回 LLM:
client = OpenAI(
    api_key=os.environ["MOONSHOT_API_KEY"],
    base_url="https://api.moonshot.cn/v1",
)

content = sys.argv[1]
init_message: ChatCompletionMessageParam = {
    "role": "user",
    "content": content,
}

completion = client.chat.completions.create(
    model="kimi-k2.6",
    messages=[init_message],
    tools=[read_tool],
    extra_body={"thinking": {"type": "disabled"}},
)

# LLM decided to use the read tool
tool_call = next(
    choice.message.tool_calls[0].function
    for choice in completion.choices
    if choice.finish_reason == "tool_calls"
)
print(f"[Tool: {tool_call.name}]")
args = ReadArgs.model_validate_json(tool_call.arguments)
result = do_read(args)

# Send the result back to LLM
assistant_message: ChatCompletionAssistantMessageParam = {
    "role": "assistant",
    "tool_calls": completion.choices[0].message.tool_calls,
}

tool_message: ChatCompletionToolMessageParam = {
    "role": "tool",
    "content": result,
    "tool_call_id": completion.choices[0].message.tool_calls[0].id,
}

# Get final LLM response
final_completion = client.chat.completions.create(
    model="kimi-k2.6",
    messages=[init_message, assistant_message, tool_message],
    tools=[read_tool],
    extra_body={"thinking": {"type": "disabled"}},
)

print(final_completion.to_json())
执行脚本,看下运行结果:
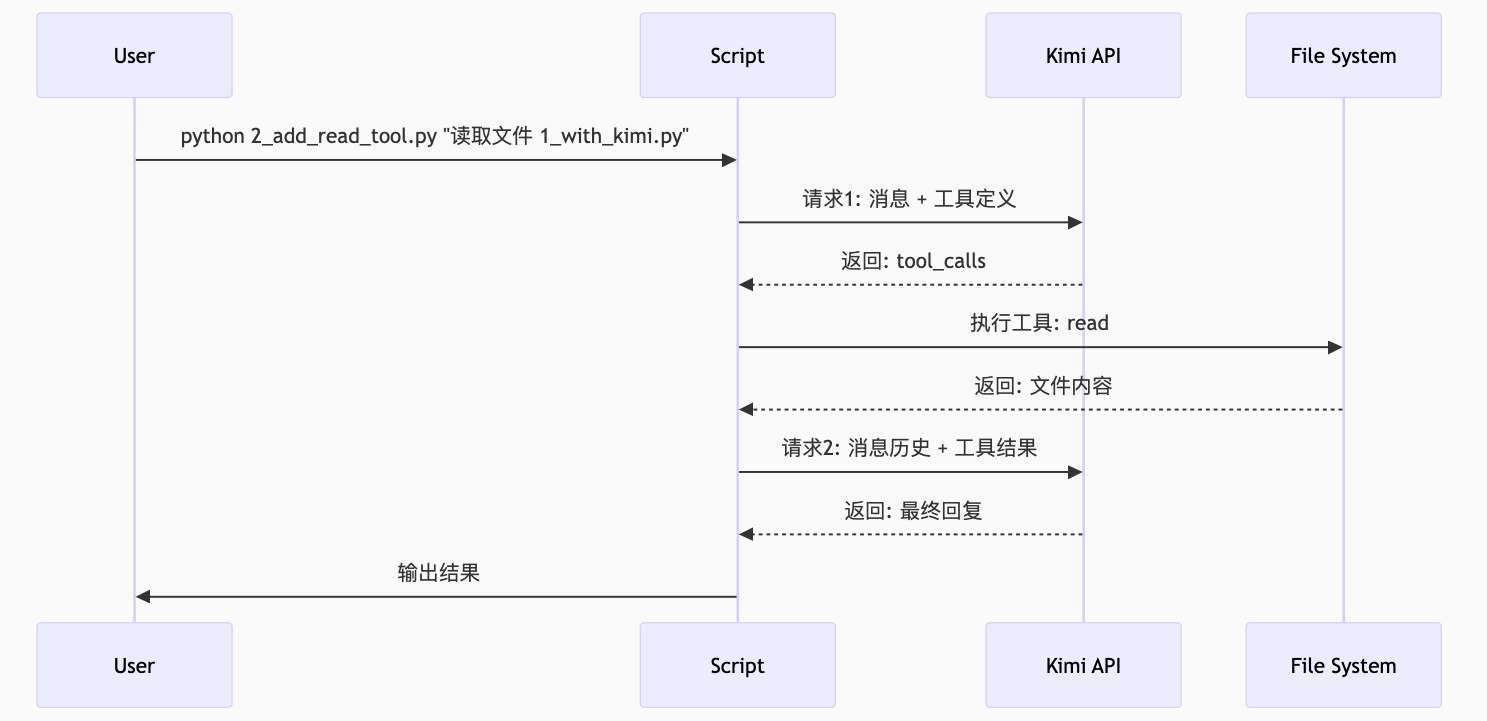
python 2_add_read_tool.py "读取文件 1_with_kimi.py"
{
  "id": "chatcmpl-69e7abbffd3dc648605819a3",
  "choices": [
    {
      "finish_reason": "stop",
      "index": 0,
      "message": {
        "content": "文件 `1_with_kimi.py` 的内容如下:\n\n```python\nimport sys\nimport os\n\nfrom openai import OpenAI\nfrom dotenv import load_dotenv\n\nload_dotenv()\n\nclient = OpenAI(\n    api_key=os.environ[\"MOONSHOT_API_KEY\"],\n    base_url=\"https://api.moonshot.cn/v1\",\n)\n\ncontent = sys.argv[1]\n\ncompletion = client.chat.completions.create(\n    model=\"kimi-k2.6\",\n    messages=[\n        {\n            \"role\": \"user\",\n            \"content\": content,\n        }\n    ],\n)\n\nprint(completion.choices[0].message.content)\n```\n\n这是一个使用 Moonshot AI API 调用 Kimi 模型的 Python 脚本。它的主要功能:\n\n1. **导入依赖**:使用 `openai` 库(兼容 OpenAI API 格式)和 `python-dotenv` 加载环境变量\n2. **配置 API**:从环境变量读取 `MOONSHOT_API_KEY`,设置 Moonshot API 的基础 URL\n3. **接收输入**:通过命令行参数 `sys.argv[1]` 获取用户输入内容\n4. **调用模型**:使用 `kimi-k2.6` 模型生成回复\n5. **输出结果**:打印模型的回复内容\n\n使用方法示例:\n```bash\npython 1_with_kimi.py \"你好,请介绍一
下自己\"\n```",
        "role": "assistant"
      }
    }
  ],
  "created": 1776790463,
  "model": "kimi-k2.6",
  "object": "chat.completion",
  "usage": {
    "completion_tokens": 286,
    "prompt_tokens": 214,
    "total_tokens": 500,
    "prompt_tokens_details": {
      "cached_tokens": 214
    },
    "cached_tokens": 214
  }
}
注意脚本中发起了两次 LLM 调用:
- 一次告知 LLM 可用的工具
- 第二次将工具调用的结果发送回 LLM
下面的时序图很直观地展示了组件之间的交互过程:
2.2.2 添加更多工具
我们已经添加了一个 read 工具,作为一个编码 agent 还需要这些功能:
- 写新文件
- 编辑现有文件
- 执行代码来测试
它们对应另外三个工具:write、edit 和 bash。
跟 read 工具类似的,先定义工具参数:
class WriteArgs(BaseModel):
    """Create or overwrite a file.""" ""

    file_path: str
    content: str


class EditArgs(BaseModel):
    """Find and replace text in a file.""" ""
    file_path: str
    old_str: str
    new_str: str


class BashArgs(BaseModel):
    """Execute a shell command.""" ""
    command: str
然后是实际工具逻辑:
def do_write(args: WriteArgs) -> str:
    try:
        path = Path(args.file_path)
        path.parent.mkdir(parents=True, exist_ok=True)
        path.write_text(args.content)
        return f"Wrote {len(args.content)} bytes to {args.file_path}"
    except Exception as e:
        return f"Error: {e}"


def do_edit(args: EditArgs) -> str:
    try:
        path = Path(args.file_path)
        content = path.read_text()
        new_content = content.replace(args.old_str, args.new_str)
        path.write_text(new_content)
        return "Edit successful"
    except Exception as e:
        return f"Error: {e}"


def do_bash(args: BashArgs) -> str:
    try:
        result = subprocess.run(
            args.command,
            shell=True,
            capture_output=True,
            text=True,
            timeout=60,
        )
        output = result.stdout + result.stderr
        return output if output.strip() else "(no output)"
    except Exception as e:
        return f"Error: {e}"
接下来注册工具 schema:
tools: Iterable[ChatCompletionToolParam] = [
    {
        "type": "function",
        "function": {
            "name": "read",
            "description": "Read a file.",
            "parameters": ReadArgs.model_json_schema(),
        },
    },
    {
        "type": "function",
        "function": {
            "name": "write",
            "description": "Write a file.",
            "parameters": WriteArgs.model_json_schema(),
        },
    },
    {
        "type": "function",
        "function": {
            "name": "edit",
            "description": "Edit a file.",
            "parameters": EditArgs.model_json_schema(),
        },
    },
    {
        "type": "function",
        "function": {
            "name": "bash",
            "description": "Run a shell command.",
            "parameters": BashArgs.model_json_schema(),
        },
    },
]

tool_register = {
    "read": (ReadArgs, do_read),
    "write": (WriteArgs, do_write),
    "edit": (EditArgs, do_edit),
    "bash": (BashArgs, do_bash),
}

cls, tool = tool_register[tool_call.name]
args = cls.model_validate_json(tool_call.arguments)
result = tool(args)
执行脚本,看下运行结果:
$ python 3_add_more_tools.py "生成一个 hello.py 输出 hello agent"
[Tool: write]
{
  "id": "chatcmpl-69e82e3f15c65485915eb447",
  "choices": [
    {
      "finish_reason": "tool_calls",
      "message": {
        "content": "",
        "role": "assistant",
        "tool_calls": [
          {
            "id": "bash:1",
            "function": {
              "arguments": "{\"command\": \"python hello.py\"}",
              "name": "bash"
            },
            "type": "function",
            "index": 0
          }
        ]
      }
    }
  ],
  "created": 1776823888,
  "model": "kimi-k2.6",
  "object": "chat.completion",
  "usage": {
    "completion_tokens": 20,
    "prompt_tokens": 213,
    "total_tokens": 233
  }
}

$ python hello.py
hello agent
LLM 现在可以编写代码、运行代码、查看结果并修复。但是 Kimi 返回的响应还需要 agent 执行 python hello.py 命令,当前的代码只能处理一个工具调用,接下来我们构建 agent 循环来解决这个问题。
注意
bash工具的实现,通过这个工具可以删除整个文件系统,所以比较危险,建议在隔离环境中运行脚本。
2.3 构建 agent 循环
实际任务通常需要多个步骤:读取文件、编辑它、运行它、查看错误、修复它。我们需要实现一个循环,让 LLM 可以持续调用工具直到任务完成。
将工具的调用封装在 while True 循环中:
tool_register = {
    "read": (ReadArgs, do_read),
    "write": (WriteArgs, do_write),
    "edit": (EditArgs, do_edit),
    "bash": (BashArgs, do_bash),
}

client = OpenAI(
    api_key=os.environ["MOONSHOT_API_KEY"],
    base_url="https://api.moonshot.cn/v1",
)

content = sys.argv[1]
messages: Iterable[ChatCompletionMessageParam] = [
    {
        "role": "user",
        "content": content,
    },
]

task_done = False
while True:
    completion = client.chat.completions.create(
        model="kimi-k2.6",
        messages=messages,
        tools=tools,
        extra_body={"thinking": {"type": "disabled"}},
    )

    for choice in completion.choices:
        if choice.finish_reason == "stop":
            print(completion.to_json())
            task_done = True
    if task_done:
        break

    for choice in completion.choices:
        if choice.finish_reason == "tool_calls":

            assistant_message: ChatCompletionAssistantMessageParam = {
                "role": "assistant",
                "tool_calls": choice.message.tool_calls,
            }
            messages.append(assistant_message)

            for tool_call in choice.message.tool_calls:
                print(f"[Tool: {tool_call.function.name}]")

                cls, tool = tool_register[tool_call.function.name]
                args = cls.model_validate_json(tool_call.function.arguments)
                result = tool(args)

                tool_message: ChatCompletionToolMessageParam = {
                    "role": "tool",
                    "content": result,
                    "tool_call_id": tool_call.id,
                }
                messages.append(tool_message)
注意,我们发送给 LLM 的消息包含循环过程中生成的所有历史消息,在实际工程中,这里需要构建更有效的上下文管理。
我们通过一个多步骤任务来测试脚本:
$ python 4_add_agent_loop.py "生成一个 python 脚本输出 hello agent,保存在 hello.py 中,然后运行"
[Tool: write]
[Tool: bash]
{
  "id": "chatcmpl-69e83d4aa963dee2c374ad30",
  "choices": [
    {
      "finish_reason": "stop",
      "index": 0,
      "message": {
        "content": "已完成!我创建了一个 `hello.py` 文件,内容为 `print(\"hello agent\")`,并运行了该脚本,成功输出了 `hello agent`。",
        "role": "assistant"
      }
    }
  ],
  "created": 1776827775,
  "model": "kimi-k2.6",
  "object": "chat.completion",
  "usage": {
    "completion_tokens": 36,
    "prompt_tokens": 262,
    "total_tokens": 298
  }
}
2.4 构建对话循环
现在 agent 处理一个查询后就会退出,真实的场景是这样的:用户问一个问题,得到答案,继续下一个问题。所以我们还需要一个不断请求用户输入的外部循环。
messages = []

while True:
    user_input = input("> ")
    if not user_input.strip():
        continue

    messages.append({"role": "user", "content": user_input})

    task_done = False
    while True:
        completion = client.chat.completions.create(
            model="kimi-k2.6",
            messages=messages,
            tools=tools,
            extra_body={"thinking": {"type": "disabled"}},
        )

        for choice in completion.choices:
            if choice.finish_reason == "stop":
                print(completion.to_json())
                task_done = True
        if task_done:
            break
执行脚本,看看运行效果如何:
$ python 5_add_user_loop.py
> hello
Hello! How can I help you today?

> 写一个 shell 脚本,输出 hello agent, 保存在 hello.sh 中,不需要运行。
[Tool: write]
已创建 `hello.sh` 文件,内容如下:

\```bash
#!/bin/bash
echo "hello agent"
>
\```

脚本已保存,未运行。
每轮对话都会包含历史消息,所以 LLM 可以记得上下文,至此我们就实现了一个完整的编码 agent。
实现中只是追加所有以前的消息,这意味着上下文会增长得很快。
写在最后
事实上,编码 agent 可以当作通用 agent 来用,只是它恰好擅长编写代码。不管是编码 agent,还是搜索 agent、浏览器 agent、电子邮件 agent、数据库 agent,无论执行什么任务,它们都遵循相同的模式,唯一的区别在于它们所使用的工具。
最近爆火的 harness 工程概念,本质上还是在围绕 LLM 构建脚手架和基础设施。如果把 LLM 比作一匹日行千里的良驹,那 harness 工程就是在给 LLM 配上“挽具”:
- 循环 - 请求模型、解析其输出、执行工具、反馈结果
- 执行工具 - 运行模型请求的代码/命令
- 上下文管理 - 构建提示词、维护历史对话、控制上下文大小
- 安全和审计 - 操作权限控制、隔离、操作历史
- 状态 - 跟踪对话和文件变动
- 等等
示例项目放在 https://github.com/cuiguoke/easy-agents,感兴趣的小伙伴还可以参考下面两个项目:
- Pi 编码 agent - 支持从多个目录加载
AGENTS.md上下文、会话恢复、子会话等工具,系统设计为可扩展的,支持 skills、工具等等 - OpenClaw - 功能更丰富:持久运行、支持 IM 接入(Telegram、WhatsApp 等)、基于文件的记忆系统(
SOUL.md、MEMORY.md、每日日志)、定时任务、预集成工具(浏览器、子 agent、设备控制)等等
参考资料
How To Build a General Purpose AI Agent in 131 lines of Python